Here we are at another Tutorial Tuesday! It feels like Friday because tomorrow is a holiday!
In preperation for our BIG 4th of July party, I decided to do some bunting!! {not softball}
I love all things burlap so I decided to make a flag banner. Now, I saw this on Pinterest, but when I clicked on it there wasn't anything attached to it...I don't know why that happens sometimes. So, I don't know if there is an original tutorial somewhere or not. Mine, is a little different from the one I saw too. So, I am claiming it as original! :)
Materials Needed:
1. Burlap-I used maybe 1/2 yard {not an exact measurement}
2. Triangle template
3. Red and Blue paint {I was going to use white, but decided against it for a more rustic look}
4. Paint Brush
5. Scissors
6. Sharpie
7. Star Stickers
8. Paint brush {you can use a smaller one, this is just the first one I grabbed}
9. Painter's Tape {or any tape that won't allow the paint to bleed}
10. Ruler
11. Jute {or whatever kind of string you would like to use to hang it by}


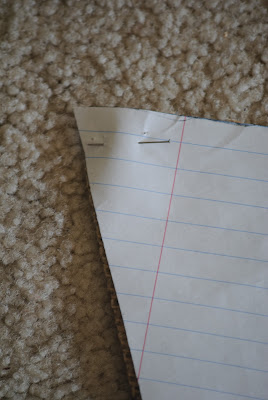
Cut a template to whatever size you want your triangle to be. This is where I used my ruler and I used loose leaf paper just so I knew the top of my triangle would be straight! I drew a line at the top using my ruler then I found the center of that line and drew a straight line down to the bottom of the page. Then, I put the edge of my ruler to the end of one side of the line and connected it with the bottom of the line that I drew down the center. Do this for both sides, you should have a perfect triangle. {Sorry I don't have pictures for this part...if you have questions, email me and I can draw a picture}
Pin the template to your burlap so it doesn't move...make sure there aren't any wrinkles in it. Cut around the template. You can draw around it {here's where the sharpie comes in} but make sure you make it a little wider and cut on the inside of the sharpie line...this way it won't show when you cut it out.


I forgot to take a picture of this before I started painting, but I laid my triangles out on my jute to make sure I had the look I was going for. All together I used 9 triangles so I had a center point.

Place your star stickers {or whatever you use} on to your triangle. I sort of did a pattern but wanted some of my stars to hang off of the edge, so it's a little random. Do whatever your little heart desires...pattern or random!

Start painting your first triangle. I made two of the blue ones with stars. I put my paint on one paper plate and my triangle on the other. You can use newspaper or anything really...just make sure to use something if you're on a surface that you don't want ruined because the paint WILL bleed through the burlap!


I immediately peeled my stars off because I didn't want the paint to dry around them and crack or peel when I tried to take the star off.

Tape off your stripes. I used my ruler for this as well to make sure my lines were even and straight. Just measure how wide the tape is and measure from the bottom and put your next strip of tape.

Again, I removed my tape immediately to prevent the paint from drying and sticking to it.
Let the paint dry all the way before moving on. If you don't your paint will more than likely smear! Then you would have to start over...who wants to do that? Patience! :)

Here is what you should have at this point...9 triangles {7 painted with red stripes and 2 painted blue with stars}

Fold your jute {or whatever you are using} in half to find the center point. I measured my jute before hand to make sure it was the correct length for where I wanted to hang it. {see finished product}

Lay your triangles out on your jute again to make sure they are evenly spaced. Pin them in place. I folded my burlap about 1/4" over the jute. You want to make sure you have enough to sew on the back. {again...I'm sorry I don't have a picture of this, but if you need an example email me and I can send you a picture}


Sew along the the bottom of the jute. If you have pinned your triangles evenly, you can sew them to your jute. If you feel like you're going to need to adjust them, sew just below the jute. Then you can slide the triangles around to where you want them to be.


I'm so excited for tomorrow! Pray for no rain! This holiday is right next to Christmas for me...one because it's summer and two because of the meaning behind it! Remember all those who have given their lives {fighting and at home} and those who are still serving! Think about what you're freedom means to you! Please, please, please don't take advantage it....we live in the best country!
God Bless America!


OMg this is SOOOO cute! I want to make one this afternoon for our party too. You are so creative!
ReplyDeleteawww thanks! It's super easy so you should be able to do it this afternoon! I'd like to see the finished product if you do! :)
Delete-Happy 4th!
That is too cute and simple too, but the finished product is definitely an eye catcher.
ReplyDeleteIm now following from PICKINandPAINTIN.blogspot.com. Please come visit me. 8-)
I will for sure be over to check you out! ;) It's too simple but adds a lot of festiveness {is that a word?}
DeleteGlad you're here!
Stopping by from the hop...your banner is so cute! Perfect for the 4th! Can't wait to follow along your journey.
ReplyDeleteYay!! So glad you're here! Thank you! We had a great time!
DeleteOH that is sooooo cute! I am so going to do that!
ReplyDeleteStopping by from the blog hop! Happy 4th!
Oh Good! thanks for stopping by! We had a wonderful day!
Deletethank you! :)
ReplyDeleteThanks for stopping to say hello!!!
What a cute and fun idea! Following you from the Blog Hop, would appreicate a follow back :)
ReplyDeletehttp://sevenone2.blogspot.com/
Have a great day!
oh absolutely...I'll be right over! :)
DeleteI'm so glad that you're here!
This is really too cute for words. I'm so happy that I found you through Coast to Coast. We are only an hour or so away from one another and I blog at www.throughtheeyesofthemrs.com Can't wait to get to know, xoxo
ReplyDeleteOh yay!! I'm glad you found me! Isn't that a great place?!
DeleteI will be over to follow back! I can't wait to get to know you either!
Danielle, you had me at burlap! The dark blue dipped triangles are simply wonderful! Thank you for leaving a sweet comment on my picnic on the floor :)
ReplyDelete:) Meeha! They are my favorite part of the banner as well! :) Glad you stopped by!
Delete