June 19, 2012
Tutorial Tuesday-Confetti Wall Art
Good Tuesday to ya!
I am fully recovered from whatever it was that tried to attack my body yesterday
and ready to craft it up with you!
Materials
Needed:
1. Canvas (you can
get these in any size at any craft store)
2. Mod Podge (Matte
is better but don't over use because you can see the extra after it dries)
3. Sponge brush or
paint brush
4. Confetti (in
your color choice-I found mine at a party store)
5. Paper plate or
something to put your mod podge on


Put some Mod Podge
on your plate and use your foam brush to make strokes in the pattern you want. I
wanted more of a rain fall look so I put a lot of glue at the top and trickled
it down towards the bottom.

Then sprinkle the
confetti over the whole canvas. I didn't want to waste any of my confetti since
I was making 3 different pieces, so I dumped the excess on to my kitchen table
to reuse.

Here is the one of
the finished products. The confetti should only stick to the parts that have the
glue on them.

This is a close up
of the top with the trickle effect.

The three finished pieces for our
bedroom. I wanted each one of them to be a different rain pattern. This one is
pretty easy as well. Nothing to profound!
you can find my inspiration here
June 12, 2012
Tutorial Tuesday-Yarn Wrapped Letter
Happy Tuesday
everyone! Welcome to Tutorial Tuesday! I have made tons of these letters for our
house...family...friends...and I sell them in my Etsy
Store. They are super easy and you can customize the yarn to any color you
want. This is one I did for our living room. I have a wall painted dark blue and
the rest of the walls are a creamish {that's an ugly word} color.
1. Paper Mache
Letter {any type will work really-I bought mine at Joann Fabrics}.
2. Yarn {your
choice of color}
3. Hot Glue
Gun
4. Hot Glue
Sticks

Put a little
glue on what ever edge you would like to start on. If you have end caps on your
letter like in the "c" above, leave those for last.
Attach your
string to the glue spot. I always like to over hang my yarn so I can cut it
flush with the edge of the letter. It's easier to hide that way.

Occasionally put a dab of glue
to make sure your yarn isn't going to move.


Leave a gap around the corners.
It is easier to go back to them separately than trying to do it now. The yarn
will just keep slipping off and it gets frustrating. {trust me}


Snip the end of the
yarn off and press it down into the glue.

Now it's time to
work on those pesky flat ends. I had a hard time with these at first because I
wasn't sure which look I wanted to go for. Do I want to use one long string and
do that maze look or do the straight across look. I opted for the straight
across look. I forgot to take a close up picture of this so if you look at the
finished picture you can see what it will look like.


There you have it. Easy as pie. {which isn't very easy
usually} Excuse our unfinished hardwood floor. We are in the process of
refinishing the spot in front of our front door!
June 5, 2012
Tutorial Tuesday-Lovely Bird Bath
Materials Needed:
1.
Vine/Twiggy Wreath-12" (can be found at any craft store for next to
nothing)
2. Terra
Cotta Pot Base-big enough to fit inside of your wreath (I found mine at Wal-Mart
for $3.00 in the Garden Center)
3. Twine
or Rope-3 pieces about 5 ft. long (depending on where you live and how windy it
is going to get you might need a stronger rope)


Start by pulling your twine or rope through a little bit of
the twigs on the side of the wreath. This will help keep the twine in place
instead of just putting it on the outside of the wreath. Make sure it is
intertwined pretty good. Using the same piece repeat on the other side. You have
to "weave" it in there. Align the string so it covers some of the hole. This
will prevent your terra cotta bowl from falling through.

Tie the twine or rope to a sturdy tree branch. (note: make
sure it is a branch that is thick enough it doesn't sway in the wind. The wreath
will tip over and you will lose your water...trust me). I double knotted mine
and haven't had a problem with it coming down or undone.

Place your terra cotta bowl in the center of the wreath.
You may have to do some adjusting of your wreath. This is why I don't suggest
knotting the twine around the wreath because you have to adjust it and move it
around. You can tilt the wreath back and forth this way to distribute the weight
evenly. This is a crucial step. If you don't do this your water will spill out
and the birds won't want to come visit!

Lastly, fill your lovely bird bath with water and enjoy
watching the beautiful birds bathe. If you decide to make one, I would love to
see pictures of the finished product!
you can find the
original post here
Tuesday, June 26, 2012
Tutorial Tuesday-Red White and Blue Ruffle Wreath
Materials Needed:
1. Foam Wreath Form (found at any craft store)
2. Straight Pins
3. Felt in Red, White, and Blue (depending on how big you want
your wreath to be. Mine is a 10" wreath and I used 4 white, 3 red and 2 blue.
Basically one felt sheet for each section of color)
4. Scissors
5. Stars (I just used some star stickers that I had laying
around. I've seen wood starts, paper stars, ect. Be creative)


Cut your squares
roughly into 2x2 squares. They don't have to be perfect, but it's easier to make
the folds with a square rather than a rectangle.


Fold your square diagonally once,
then again.

Stick your pin through the point of the folded
piece of felt, and pin it to your wreath form. You don't have to "fluff" yet.
You can do that here in a couple of steps.

For your first couple of pieces, pin your points together to
make a square of sorts. This kind of gives you a guide so you don't have
scattered felt pieces pinned all over. {which will end up happening anyways,
unless you can come up with a better method}

Pin the rest of
your felt pieces around the first "square." Pin them close so you can't see the
green wreath underneath. You can wrap your wreath form in extra pieces of felt
if you would like, but if you pin them close enough you shouldn't have a
problem. Also, make sure you are flaring out the bottom of the bottom of the
stripes towards where the are going to meet the wall/door. This will help keep
the stripes looking even. You should see what I mean when you get to that point.

This picture is serving two purposes...one to
show you the connection between colors, and secondly to show you the difference
between the "fluffed" and the "unfluffed." The white section is fluffed and the
red is not! You have to play with it some to get it the right "fluff
consistency" you like. You can also add or take away the pieces if you
prefer more or less fluffiness.
Add your stars. Since mine were stickers, it was
pretty easy. Like I said, be creative...I might change the stars up eventually,
but since I had the stickers around, they were easy and didnt cost me
anything.
TaDa...very patriotic! I am so thankful for all
the people who have served, are currently serving, and have sacrificed their
lives for our country and our freedom! Why not show it but decorating with Red,
White, and Blue!

If you have any questions about
this tutorial, please feel free to e-mail me...daniellecov36{at}aol{dot}com.
Tuesday, July 3, 2012
Tutorial Tuesday-4th of July Burlap Banner
Materials
Needed:
1. Burlap-I used
maybe 1/2 yard {not an exact measurement}
2. Triangle
template
3. Red and Blue
paint {I was going to use white, but decided against it for a more rustic
look}
4. Paint
Brush
5. Scissors
6. Sharpie
7. Star
Stickers
8. Paint brush {you
can use a smaller one, this is just the first one I grabbed}
9. Painter's Tape
{or any tape that won't allow the paint to bleed}
10. Ruler
11. Jute {or
whatever kind of string you would like to use to hang it by}


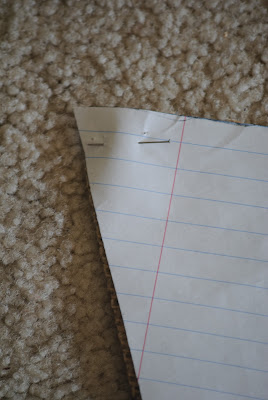
Cut a template to whatever size you want your triangle to be. This is where I used my ruler and I used loose leaf paper just so I knew the top of my triangle would be straight! I drew a line at the top using my ruler then I found the center of that line and drew a straight line down to the bottom of the page. Then, I put the edge of my ruler to the end of one side of the line and connected it with the bottom of the line that I drew down the center. Do this for both sides, you should have a perfect triangle. {Sorry I don't have pictures for this part...if you have questions, email me and I can draw a picture}
Pin the template to your burlap so it doesn't move...make sure there aren't any wrinkles in it. Cut around the template. You can draw around it {here's where the sharpie comes in} but make sure you make it a little wider and cut on the inside of the sharpie line...this way it won't show when you cut it out.


I forgot to take a picture of this
before I started painting, but I laid my triangles out on my jute to make sure I
had the look I was going for. All together I used 9 triangles so I had a center
point.

Place your star stickers {or
whatever you use} on to your triangle. I sort of did a pattern but wanted some
of my stars to hang off of the edge, so it's a little random. Do whatever your
little heart desires...pattern or random!

Start painting your
first triangle. I made two of the blue ones with stars. I put my paint on one
paper plate and my triangle on the other. You can use newspaper or anything
really...just make sure to use something if you're on a surface that you don't
want ruined because the paint WILL bleed through the burlap!


I immediately
peeled my stars off because I didn't want the paint to dry around them and crack
or peel when I tried to take the star off.

Tape off your
stripes. I used my ruler for this as well to make sure my lines were even and
straight. Just measure how wide the tape is and measure from the bottom and put
your next strip of tape.

Again, I removed my
tape immediately to prevent the paint from drying and sticking to it.
Let the paint dry
all the way before moving on. If you don't your paint will more than likely
smear! Then you would have to start over...who wants to do that? Patience!
:)

Here is what you
should have at this point...9 triangles {7 painted with red stripes and 2
painted blue with stars}

Fold your jute {or
whatever you are using} in half to find the center point. I measured my jute
before hand to make sure it was the correct length for where I wanted to hang
it. {see finished product}

Lay your triangles out on your jute again to make sure they are evenly spaced. Pin them in place. I folded my burlap about 1/4" over the jute. You want to make sure you have enough to sew on the back. {again...I'm sorry I don't have a picture of this, but if you need an example email me and I can send you a picture}


Sew along the the bottom of the jute. If you have pinned your triangles evenly, you can sew them to your jute. If you feel like you're going to need to adjust them, sew just below the jute. Then you can slide the triangles around to where you want them to be.


Tuesday, July 10, 2012
Tutorial Tuesday {Devos}
S.O.A.P.
S
for
Scripture
Open your Bible to the reading found under today's date of your Bible bookmark. Take time reading and allow God to speak to you. When you are done, look for a verse that particularly spoke to you that day, and write it in your journal.
Open your Bible to the reading found under today's date of your Bible bookmark. Take time reading and allow God to speak to you. When you are done, look for a verse that particularly spoke to you that day, and write it in your journal.
O
for
Observation
What do you think God is saying to you in this scripture? Ask the Holy Spirit to teach you and reveal Jesus to you. Paraphrase and write this scripture down in your own words, in your journal.
What do you think God is saying to you in this scripture? Ask the Holy Spirit to teach you and reveal Jesus to you. Paraphrase and write this scripture down in your own words, in your journal.
A
for Application
Personalize what you have read, by asking yourself how it applies to your life right now. Perhaps it is instruction, encouragement, revelation of a new promise, or corrections for a particular area of your life. Write how this scripture can apply to you today.
Personalize what you have read, by asking yourself how it applies to your life right now. Perhaps it is instruction, encouragement, revelation of a new promise, or corrections for a particular area of your life. Write how this scripture can apply to you today.
P
for Prayer
This can be as simple as asking God to help you use this scripture, or it may be a greater insight on what He may be revealing to you. Remember, prayer is a two way conversation, so be sure to listen to what God has to say! Now, write it out.
This can be as simple as asking God to help you use this scripture, or it may be a greater insight on what He may be revealing to you. Remember, prayer is a two way conversation, so be sure to listen to what God has to say! Now, write it out.

I'll be the first to admit I don't get to
this every day! It doesn't really take that much time and if you do it in the
morning you can meditate on the scripture all day. Tape it to your computer
screen at work, tape it to your dashboard in your car, write it on your forehead
so when you look in the mirror you see it! {ok...I'm just kidding, but you get
the point}
Happy Tuesday everyone!
p.s. this is not my original idea...I did NOT come up with this...just want to encourage! :)
p.s. this is not my original idea...I did NOT come up with this...just want to encourage! :)
Tuesday, July 17, 2012
Tutorial Tuesday-Summer Rosette Wreath
Materials
Needed:
1. Wreath form
{found at any craft store/Wal-Mart}
2. Hot Glue
Gun
3. Felt {in sheets
or by the yard it doesn't really matter. How much depends on how many flowers
you want on your wreath}
4. Yarn color of
your choice
5. Scissors


Put a dab of hot
glue on your wreath form and attach the end of your string. Hold it in place
until the glue dries.

Continue to wrap
the yarn around the entire wreath.

You will need to
leave some gaps in the yarn to prevent spaces in between. You can go back and
fill in the gaps after you're finished or at any time really. I just wait until
I'm finished that way it adds a little character and then I don't have to cut
and restart with my yarn once I'm on a roll! :)
Now to make your
flowers you will need your sheets of felt.

Start by cutting your felt sheet
into 4 squares

Cut the square into
a spirally maze. It kind of looks like hypnotic circle thing {what?}

Start rolling your
hypnotic circle inward, like you would roll up a sleeping bag. The center of the
circle should be the last thing that gets rolled up. Don't wrap too tightly, but
not to loosely either. You will see what I'm talking about when you start
wrapping. Obviously the tighter you wrap the tighter your flower and vise versa.

You will be left
with an "apostrophe" at the end which you will glue to your wrapped flower to
hold everything in place. Using your hot glue gun, spread some glue on the
spiraled part of your flower and attach the "apostrophe" to it.

When you flip it
over it should look like this. This flower is wrapped a little tighter than I
usually like them to be but since they are bigger flowers I decided to do it
this way. It's totally up to you which was you want them to be made.

I would suggest laying your flowers out in different patterns to make sure its the way you want it before you glue them down. I made two tone flowers {cut out two felt circles the same size and wrap them together the same as you would a single circle} as well as one color flowers so I wanted to make sure I liked the color combination and where each one was placed. Dab a little bit of glue onto the back of your flower and press on to your wreath. Remember the glue is permanent so make sure it's where you want it before gluing it down.


And there you have it. Hanging on the front door looking mighty summery! You can change the color of the yarn and flowers to your liking. Be creative.
Tuesday, July 31, 2012
Tutorial Tuesday {Canvas Art}
Materials
Needed:
1. Canvas {can be
any size-found at any craft store}
2. Paint {I used acrylic-again
found at any craft store}
3. Paint Brushes {different sizes
to acheive different strokes}
4. Scraper of some sort {I know
there's probably a technical name for it-I think you use it to spread drywall
compound}
5. Something to hold your paint {I
couldn't resist this paint wheel thing}
6. Sink {to rinse your
brushes}


These are the brushes I used. I think I found them at Joann Fabrics. You can see they are for acrylic, watercolors, and stains.

Here is the paint
up close. You can see it's a little tube but the great thing about acrylic paint
is that you don't have to use very much! A little goes a long way!

I actually squeezed
out too much paint here. You don't need this much if you're doing a small
canvas. I think mine was 3'x3'. But squeeze out the colors you want to use. I
ended up adding more colors just because I didn't like the way my canvas was
turning out.

This is the brush that I used the most because it adds larger and smaller brush strokes. I did end up using the smallest brush as well towards the end to add little details, but I will explain that when I get to that step.

The first thing you want to do is choose which color you want as your base color. I wanted blue because out living room has a lot of blue accents. This is a very simple concept, but can take practice so be patient and remember IT DOESN'T HAVE TO BE PERFECT. That's the great thing about art...it's just that...art. Create!
When you dip your brush in your paint, get a bigger glob but not so it's sloppy. {I should have taken a picture of this but I didn't, sorry} Figure out where you would like your bigger chunks of paint to be on your canvas and start there. I wanted mine to be pretty random with the bigger strokes, so I started at the bottom and moved the brush from left to right...back and forth. If you want smaller stokes don't push as hard with your brush. This will create lighter strokes. Add more paint to your brush as you see necessary. Make sure you rinse your brush in between colors or you will end up getting a brownish, black color. Yuck!

Repeat step one for each layer of color you would like to add. Try to spread out your chunky strokes so it doesn't look like you have a pattern. Just plan out your strokes before you lay them down, because once your paint is down you can't get it back up. You can use your scraper thingy here to flatten out your brush strokes if you would like. I ended up not using mine, just because I liked the chunky feel of it.

Continue to add layers. Remember to spread out
the chunky parts so you don't have too many clumps on one side or the other.


Here is a close up of the different colors. As you can see, it's ok to overlap the colors. I think this adds more character and seems more blended. Accidental art....sort of!

Here you can sort of see the chunkiness of the white paint. It adds texture and dimension to the art. Also, this is where you can also see the black strokes. I used the small brush for this because I didn't want too much black but just enough to highlight the light places.

Finished. Super
easy, super quick, super cheap. Much cheaper than going out and buying one.
Trust me if I can do this you can too! I'm not a painter by any means!!!
I couldn't decided
if I wanted to hang it sideways or up and down.


I decided on up and down! Someone said it looks like fish swimming up and down steam! That's the great thing about abstract art. It can be interprited so many different ways!
Tuesday, August 14, 2012
Tutorial Tuesday {Beach Towel Beach Bag}
Materials
Needed:
1. Beach towel
{size depends on how big you want your bag}
2. Scissors
3. Marking tool
{disclosure-I'm only using sharpie for tutorial purposes, please don't use a
sharpie on your project}
3. Ruler or
measuring tool
4. Sewing
Machine

Ok. Another
disclosure...this is an old tablecloth that my husband's granny gave me. It was
stained up and I didn't want to use it for our table so I decided to make a bag
out of it. You want have to do some of the steps that I'm doing if you just use
a regular towel.

I traced one of our
normal beach towels to get the desired size that I wanted. I think it was like
60x20 or something like that. When I got to this point I realized that it was
going to be a little too big for me so I cut it down to about 50x20.

Fold your towel in
half and decide if it's the size you like. If you have kids, keep in mind that
they might be carrying it too and you don't want them to be dragging it on the
ground {even though its super easy to wash} or sagging so you don't want to make
it too oversized.

At this point I had
to hem the tops of my bag because I didn't use a regular towel that has that
hard hemmed edge on it. You can skip this step if you're using a regular towel.
If not, I will explain here how to do it.
To hem, use your
straight edged ruler and mark down 1/4". Iron flat. Fold over again another 1/4"
and iron flat. Pin and sew. Sew close to the edge closest to the inside {fabric}
so you make sure you get your inside fold when you're sewing it.
I also wanted a pocket on the
inside of mine. If you don't want want to make your bag super easy, just skip
this step.

Figure out how big
you would like your pocket to be. Mine is 5"x7" which is big enough to fit my
iPhone and keys and maybe a few dollars.

Hem the edges of
your pocket following the same steps as above for hemming. You want to have a
nice finished edge on your pocket so make sure you do this step if you're
putting one in.

Pin your pocket
evenly in the middle of your bag. Your measurements might be different than
mine, but I pinned mine 6" from each edge and 4" from the top.

Sew in your pocket. Make sure you only sew 3 of
the sides leaving the top open. {hence the pocket}

Pin the three unfinished sides of your bag
together and sew. I used 1/2" seam allowance on each side. If you want to make
sure your lines are straight, you can draw your seam allowances on to your
fabric. Just make sure you use something that will wash off or not be visable
when you sew over top of it.
Now for the straps
My straps measured 20"x 2 1/2". You
can adjust the length and width to your desire. As you can see in the finished
picture that my straps aren't too long but long enough to carry the bag on your
shoulder. You will need for pieces of material that are 20"x 2 1/2". You can
either cut two pieces of material that are 20"x 5" and fold them in half or use
scrap pieces to make them. I used scrap pieces.

Pin your pieces
together right sides together {wrong sides facing up}. Sew your strips of fabric
together on the long sides leaving the ends open. This will allow you to be able
to turn them right side out when you're finished. For this I used 1/4" seam
allowance

When you're
finished sewing all the long sides together, flip your pieces inside out so the
right side is on the outside

You should have two
pieces that look like this. Long tubes really.

Once you have them
flipped right side out, you will need to top stich down both long edges of your
straps. Again here I used 1/4" seam allowance. This will give you nice finished
edges for your straps.

Measure in and down
to where you want your straps to be. The outside dot is 2" from the edge and the
inside one is 4" and 4" from the top. Make sure you make the marks on both sides
of your pocket. Again...don't use black sharpie I just did it for demonstration
purposes! If you used 1/4" seam allowances for your straps, you should have a 2"
wide strap now so it will fit perfectly between the dots.

Sew the straps on
to your bag. You can pin them in place if you would like so you make sure they
don't move. Sew your straps on in a pattern like in the picture. This will make
sure your straps are on there nice and strong. I didn't show this in the
picture, but make sure when you get to the bottom of your srap that you tuck the
unfinished edge under so you don't have uneven ends like in the picture.


And there you have it...a nice
strong beach bag that you can wash all of the nasty sand out of. Now...if only I
went to the beach all the time. Ok, ok...a pool bag then right?
Splish Splash!


I love your ideas!!!! Great!! Maybe you like to visit my blog too? I´m going to put my tutorials on it one after the other - I´m doing so many lovely thinks these days- for our new house we move to in september! I LOVE THAT bird bath!! and the Confetti Wall-Art!
ReplyDeleteMirja
Love the Tutorial Tuesday! The Bird Bath is exactly what I need for my front yard! The S.O.A.P. Journal is something I am going to start. So much going on in my life, I need to get clean! And the wall art, how cute! This will be on my to do list as well. Thanks for all the lovely ideas. Hope you are having a great week!
ReplyDelete